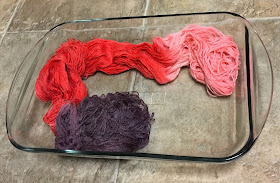
If cabin fever is starting to set in this winter, why not try dyeing your own yarn to add some color to your next project? It's easier than you think - in fact, you might have everything you need already in your kitchen! Here, we've used sugar-free Kool-Aid to dye a multi-colored skein of yarn and will show you how to do your own at-home dyeing with minimal mess.
Supplies:
- 1 skein of undyed yarn. We've used Beth, a blend of 30% US Merino Wool, 20% Silk and 50% Alpaca from Kraemer Yarns, which already has several ties on the skein to keep skeins tidy throughout the dye process. Click here to see their many undyed yarn options!
- Packets of sugar-free Kool-Aid in a variety of flavors. We've chosen Pink Lemonade, Strawberry & Grape to create a Valentine's Day-inspired colorway; click here to see the colors produced by each flavor on the Knitty blog archive.
- 3 bowls (for mixing dye).
- Microwave-safe dish. Make sure that your entire skein of yarn can fit comfortably without the colors touching.
- Gloves.
- Dish Soap.
- Spoon for mixing.
- Newsprint or brown craft paper (to cover your work area).
Dyeing Your Yarn:
1. Mix each flavor of Kool-Aid in its own bowl with hot water. For our colorway, we mixed 1 c. hot water with 1 packet of Pink Lemonade, 2 c. hot water with 2 packets of Strawberry, and 2 c. hot water with 2 packets of Grape. Stir with spoon to ensure that powder is thoroughly dissolved, then add a dash of dish soap to each bowl and give it another quick stir (the soap will help to work the dye through your skein of yarn).2. Take one end of the skein and dip it into your first bowl of dye. Gently work the dye through with your gloved hand in a "massaging" motion.
3. Take the middle of the skein and dip it into the next bowl of dye, again massaging the dye throughout the skein with your gloved hand.
4. Take the other end of the skein and dip it into your final bowl of dye, working the dye through the skein with your gloved hand.
5. Now, begin massaging your yarn to incorporate more of the undyed skein into each color section like so:
6. Allow the skein to set in the bowls for a few more moments, then transfer to your microwave-safe dish carefully, gently squeezing to remove excess dye from each color section as you do so. Make sure to go from light to dark in order to protect the lighter color as much as possible.
7. Heat set the dye by microwaving for 1-2 minutes (find more info on how to heat set your yarn here; there are also guidelines for heat setting dye in a conventional oven found here).
9. Rinse in cool water, either by hand or in a top-loading washing machine which allows you to skip to the spin part of the cycle. If rinsing by hand, gently remove excess water by squeezing skein gently, then wrapping in a fluffy towel to remove remaining moisture. Hang to dry, or lay flat on Knitter's Pride Blocking Mats, if you prefer.
Note: If this is your first time dyeing, or if you are just unsure whether or not you have correctly heat set the dye, we recommend testing a small section of the skein under running water first before immersing the entire thing. If your dye was heat set correctly, you will not see any dye in the water at this stage. It will be easier to return to step 7 to re-set the dye if you have only rinsed a tiny section!
Once your skein is dry, you can look for the the perfect pattern for your new creation!
 |
| Our Naturalz needles are a great choice for this colorful yarn! |
Like this post? Pin it!


