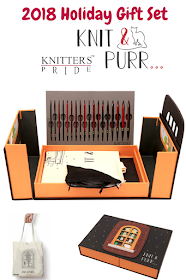
For the 2018 holiday season, we drew our inspiration from a warm and cozy home: the place that we call our own which provides us with solace and joy! A cozy home may conjure up images of curling up beside the fireplace as you knit warmth for your loved ones, enjoy a good book or perhaps a warm cup of tea. We couldn't resist putting a new spin on "Knit & Purl" with "Knit & Purr" to capture that wonderful warm feeling when your cat snuggles beside you, purring with a sense of contentment.
The Knit & Purr 2018 Holiday Gift Set is a result of the love and warmth of all of us at Knitter’s Pride - a warmth that passes onto our products and into what you create with them.
Knit & Purr carries a collection of millennium interchangeable knitting needles which are unique in every sense of the word: the needles are made from a combination of black & red laminated wood which has been interspersed together through a special process that creates a special random pattern.
Through this very special process, each pattern emerges in the needle when the wood pieces are painstakingly brought together by hand. Each needle is a unique work of art, made with the utmost care and craftsmanship, just as every knitter leaves their unique mark on their creation!
Packaged beautifully in a specially-designed box resembling a cozy abode, Knit & Purr includes:
Want to leave a not-so-subtle holiday hint for someone? Save this post to Pinterest using the graphic below!
The Knit & Purr 2018 Holiday Gift Set is a result of the love and warmth of all of us at Knitter’s Pride - a warmth that passes onto our products and into what you create with them.
Knit & Purr carries a collection of millennium interchangeable knitting needles which are unique in every sense of the word: the needles are made from a combination of black & red laminated wood which has been interspersed together through a special process that creates a special random pattern.
Through this very special process, each pattern emerges in the needle when the wood pieces are painstakingly brought together by hand. Each needle is a unique work of art, made with the utmost care and craftsmanship, just as every knitter leaves their unique mark on their creation!
Packaged beautifully in a specially-designed box resembling a cozy abode, Knit & Purr includes:
- Nine pairs of the Millennium Interchangeable Needle Tips with black connectors in sizes US Size: 4, 5, 6, 7, 8, 9, 10, 10.5, 11
- Four black cords in lengths of 24", 32" (two) & 40" and a set of cord connectors packed in a fabric pouch
- Free bonus gift: reusable "Knit & Purr" tote bag made in an eco-friendly fabric
Want to leave a not-so-subtle holiday hint for someone? Save this post to Pinterest using the graphic below!


