Pages

Tips for Working With Hand-Dyed Yarns

There are so many beautiful hand-dyed options available for yarn lovers, but they can sometimes be a challenge to work with. On today's post, we'll cover four key areas to consider before starting your next project with a hand-dyed yarn to ensure maximum satisfaction with your FO (finished object)!

1. Buy a "safety skein."

Buying enough yarn for your project may seem like obvious advice, but judging by the number of #yarnchicken posts on Instagram, it can be easier said than done! A good rule of thumb is to add an extra skein to the amount of yarn you think you need to ensure that all of your skeins are from the same dye lot. With the amount of variation amongst hand-dyed yarns (not to mention, the number of unrepeatable/one-of-a-kind colors out there), you'll be glad you did! If you end up having that safety skein of yarn left over, you can always make a matching hat, or enter it into your Ravelry stash as for sale/trade - chances are, someone will be interested in giving it a new home.


2. Pick the right pattern. 

#Specklesaresohotrightnow, but they don't go with everything! Many of those variegated color ways that look so pretty in the skein can be difficult to pair up with patterns, as more complex stitch patterns can get lost when they compete with a variegated colorway.

More complex lace and cables are generally better suited to shaded solids, but if there is a pattern that you've got your heart set on for that special skein, do a little research first. Check Ravelry to see other people's projects - it's likely someone else has made that shawl pattern with a variegated yarn, and if you like how theirs turned out, yours will probably look great, too! Of course, you can knit a swatch with your yarn as the final determination of whether or not to proceed, but checking Ravelry first can save you a little time!

Lastly, a pattern with lots of shaping or slipped stitches will minimize pooling, which is when colors stack up while knitting to form larger splotches of color. This may or may not be a desirable effect - just check the Planned Pooling thread in the Yarn & Fiber Ravelry group to see some stunning examples of both ends of the spectrum.

3. Alternate Skeins.

If you'll be using more than 1 skein of the same color in your project, alternating skeins is the best way to ensure that any variations between those skeins are minimized - otherwise, you might have a very visible line where the new yarn was joined. Here is a great blog post about methods for alternating skeins:

What if you forgot to buy that safety skein of yarn, and lost at yarn chicken? Alternating skeins is also a great way to introduce a different dye lot of the same color into your project with minimal detection (just make sure that you have enough of your original yarn to alternate rows for at least a few inches).

Image via Handmade by Stefanie; used with permission.

Sure, you can take your chances and hope for the best, but alternating skeins really isn't as fussy as it sounds, and the results are worth it.


4. Test Color Fastness.

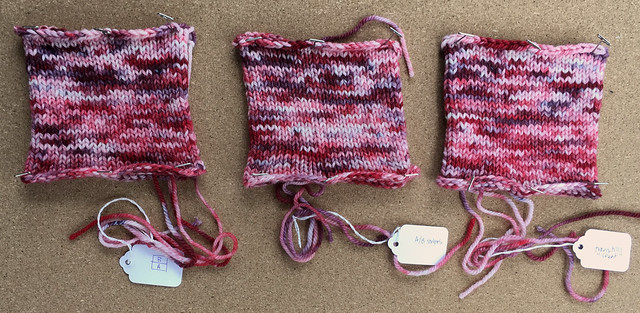
Reds, pinks and yellows are the hardest dyes to set properly. Newbie and experienced dyers alike have this problem! While these three hues are the most prone to bleeding, ANY color can be at risk. Especially if you are using multiple colors and/or pairing light with dark, checking for color fastness is a month before you begin your project. There is nothing sadder than those crisp white stripes becoming tinged with its neighboring color. It's better to be safe than sorry!

Staci Perri of Very Pink Knits has a super simple method for testing for color fastness:


We hope these tips help you to plan your next project with hand dyed yarn, and we would love to hear your own ideas and tips in the comments!

Like this post? Pin it!


Winner + Spring Home Decor KAL/CAL Round-Up

First, let's announce the winner of our June blog giveaway - congratulations to caffeine72 with this comment:


We'll be in touch via Ravelry to coordinate the prize delivery. Thanks to everyone else who took our quiz and entered the contest!

Spring Home Decor KAL/CAL Round-Up
We had a great time seeing all of the clever home decor patterns that you all knit or crocheted over the last couple of months.

Here are just a few of the projects that caught our eyes.

#1. Dishsoap Bottle Dress and Cloth
The moment we saw these dresses, we thought they were super clever, and a fun way to bring a little fun into the kitchen.


What a great idea, and we are sure to see more of these popping up on Ravelry! Thanks to LeilaEvelyn on Ravelry for sharing these with us.

#2. The Spa-Riffic Wash Cloth
Many of you took to this delightfully textured pattern, and the results were fabulous!
This one by 55yrknitter looks great with that hand poured bar of soap.


Knittingdancer made hers in this stunning bright orange!


#3. Fronded Trivet
We thought this dual colored pattern deserved some attention. The subtle patterning makes this a great addition to your kitchen or even a botanical inspired bathroom, Great work CornucopiAmy!


Here are the winners for our prizes, as chosen by the Random Number Generator:
2. kshufelt from Ravelry - Knit Blockers 
3. Asteride from Instagram - Reverie Fabric Bag

We will get in touch with you via Ravelry to arrange for the delivery of your prizes. Thanks to everyone who entered our KAL/CAL!

What Does Your Knitting or Crochet Project Say About You?

There are many types of crafters out there - what kind are you? We've created a fun quiz for our fans, click START below to see what your crafting preferences say about you!

Share your quiz results in the comments below for your chance to win your choice of these 2 prizes: a Royale IC Starter Set or a Waves Crochet Set- we'd love to know just how accurate our quiz is!

Don't forget to also include your email address or Ravelry ID so that we can contact you if you win. We'll randomly select one lucky winner to announce on our next blog post on Friday, July 14th. Good luck!


Share this quiz with your crafting friends to see their results using this link or the sharing links at the bottom of this post! 

How to Square Off a Circular Crochet Motif


If you love making crocheted motif blankets, you probably know that it is difficult to join circular motifs together without leaving gaps. In this tutorial, we're going to show you how to square off a circular crochet motif.

First, count the number of stitches around your circle.

If this number isn't divisible by 4, then single crochet around the circle while evenly increasing  the number of stitches necessary to reach a stitch count that is divisible by 4.

If this number is divisible by 4, then work 1 round of single crochet around around the circle.

Why do we need a stitch count that is divisible by 4? We will be treating the circle as a square, dividing it into four "sides."

Example: 
A circle with 42 stitches will need two more stitches to reach a stitch count that is divisible by four.

To do this, *work single crochet for 20 stitches, increase in the next stitch, ** then repeat from * to ** to the end of the round. You will now have 44 stitches, which is 4 sections of 11 stitches.


Before we move on to the next step, it may be helpful for you to look at this image of the finished shape you are trying to accomplish, as compared to the current shape of your piece:


You'll be creating the edges of the square by adding taller stitches to the areas on the circle which correspond to the corners of the square shown above. As you might have guessed, the sides will need less fabric to complete the transition.

To make the squaring off round easier, the beginning of the round will be in the center of the square side, as seen in the illustration above.

In the sample shown below, the following pattern was used:
sc2, hdc, dc, dc2 in next st, ch2, *dc2 in next st, dc, hdc, sc5, hdc, dc, dc2 in the next st, ch2, repeat from * 2 more times, dc2, in next st, dc, hdc, sc3. Slst into first st to join round.

When you work this round, notice that the hdc and dc stitches create wedges which build the corners when paired with the other wedges.


For larger or smaller circles, you will need to adjust the pattern by either adding a sc, hdc, or dc to the pattern. This may require a little experimentation one your part as you try out different types of stitches to get your ideal shape.


Below are two free patterns to modify and turn into square motifs using this technique!

The Little Spring Mandala


Roller Coasters


We'd love to see what you make with this tutorial; share your results with us on Instagram using the hashtag #knitterspride in your post.


Free Knitting Pattern: Spa-Riffic Wash Cloth

There’s still plenty of time to join our Spring Home Decor KAL/CAL here on Ravelry! Today, we share a free knitted wash cloth pattern you can knit up in a jiffy using your favorite cotton yarn for your chance to win one of our fabulous KAL prizes. We also have a special bonus giveaway just for our blog readers (keep reading for more on that!).

If you prefer not to work two strands of a fingering weight yarn together in your project, you can substitute in a single strand of worsted weight cotton to make an equally lovely wash cloth.


Spa-Riffic Wash Cloth
By Stefanie Goodwin-Ritter
Finished measurements: approx. 10.5” square

Gauge: 18 sts & 24 rows = 4 inches St St

Supplies:
  • US 8 Needles (single point or fixed circular; cloth is worked flat)
  • 1 skein Kraemer Patti Yarn (100% US Organic Combed Cotton, fingering weight, 350 yards/100g), split into two balls and held double throughout
  • Darning needle
  • Blocking Mats
  • Knit Blockers

To make cloth:
CO 46 sts.

Work 6 rows garter stitch (knit every row).

Begin Patt Stitch:

Row 1 (RS): K3, *K5, P5, repeat from * to last 3 sts, K3.
Row 2 (WS): K7, *P5, K5, repeat from * to last 9 sts, P5, K4.
Row 3: K3, P2, *K5, P5, repeat from * to last 11 sts, K5, P3, K3.
Row 4: K5, *P5, K5, repeat from * to last 11 sts, P5, K6.
Row 5: K3, P4, *K5, P5, repeat from * to last 9 sts, K5, P1, K3.
Row 6: K3, *P5, K5, repeat from * to last 3 sts, K3.

Repeat Rows 1-6 a total of 10 times, or until cloth has reached desired length.

Work 6 rows garter stitch (knit every row). Bind off.

Weave in ends and wash with your favorite fiber wash. We recommend using Knitter’s Pride Blocking Mats and Knit Blockers to block to finished measurements like so:


Allow to dry, then enjoy during your next spa day!

Giveaway
We have a special BONUS giveaway, just for our blog readers! Leave a comment on this post telling us what project you plan to knit or crochet for our Spring Home Decor KAL/CAL for your chance to win the yarn & needles to knit this wash cloth pattern! Be sure to also mention your Ravelry ID or email address so that we can notify you if you’ve won.

We’ll randomly select 1 lucky winner to announce in this Ravelry thread on Friday, June 2. Good luck!  

ETA: We have a winner, congratulations to Raveler knit-frog-knit!

Join Our Spring Home Decor KAL/CAL!

With Spring and Summer comes warmer weather, and the desire to knit or crochet cozy woolens is gone. You don’t need to put down your hooks or needles though, it’s time to make home decor!

From now until June 30th, we’re hosting a home decor CAL/KAL - just knit or crochet something for your home and share it with us in this Ravelry thread for your chance to win great prizes (more on that in a bit).

During the month of May, we’ll be sharing pattern ideas on our Facebook page, so be sure to check those out. In the meantime, here are 3 of our favorite home decor patterns to inspire you:

This blanket is amazing because it allows to create any size of blanket all the while only having 10 stitches on your needles at a time. This is a variation on the rectangular blanket, made famous by Staci Perry’s tutorials on her Very Pink Knits YouTube Channel.

This is a trend that continues to be popular, this crochet pattern by Nadia Fuad is so fun. It would look especially great in a semi-solid yarn.

We love this basket pattern with the chunky braids and handles! Now you can have a knitting basket that you knit yourself!

As previously mentioned, there are some great prizes up for grabs for anyone participating in our CAL/KAL:
Winners will be selected from the Ravelry group thread and from Instagram, using the event hashtag #KPSpringKAL. You can make as many projects as you like for multiple entries in the contest drawing; double dipping with other KAL/CALs is ok, too!

Once the KAL/CAL closes, we'll announce the winners here on our blog at the beginning of July.

Be sure to share your projects on Instagram with the hashtags #knitterspride and #KPSpringKAL. We can't wait to see what you make, and don't forget to add our blog to your reading list because in our next post, we’ll share a free knitted wash cloth pattern!

Winner + Designer Spotlight: Pia Thadani

As part of our ongoing Designer Spotlight series, we take a look at what makes designers tick.

This week we have Pia Thadani, crochet designer and Crochet Guild of America Member! Pia calls the beautiful state of Illinois home.

Pia designed the Sargassum Shawl featured in the Crochet Guild of America Crochet Along this month! Be sure to participate for a chance to win a set of our Crochet Hooks that we donated to the CAL.


When did you learn to crochet? Do you do any other crafts?
My mom taught me to crochet when I was very young – maybe around 5. I started with chaining by hand, without a hook, to make bracelets. When I got tired of that, I still remember spending days making mile long chains and then braiding them together to form jump ropes (which only worked marginally well, but was still fun)! Mom taught me lots of other fiber arts too – knitting, tatting, embroidery, needlepoint, rug hooking, macramé, sewing, and probably more that I’ve forgotten. I can’t remember any part of my life that didn’t involve making things, and I’ll try pretty much any new craft. Sometimes they work out, and other times I’m just horrible at them (like sewing). I tend to go in spurts – for a while, I was obsessed with scrapbooking, and more recently it’s been spinning. Crochet has more or less stuck as my main passion through all of them though.
How did you get started designing?
I actually started blogging first, as sort of a crafting diary, and would write about modifications I was making to patterns. I almost never follow a pattern exactly as written, and I’ve always been that way. I usually read through it, get the gist, and then start making bits up as I go. My blogging friends soon started encouraging me to make up whole patterns from scratch, and everything just grew from there. Joining the CGOA was a big step for me in taking crochet from a hobby to a business. The local chapter activities, online projects, and national conferences have all provided invaluable networking and learning opportunities. On top of that, the new friendships and sense of community I’ve found through the CGOA have been amazing.
What is your design process typically like? - or - What are your favorite projects to design?
Growing up, crochet to me was always about gift giving on a budget. I still love to make things for other people, so I often end up designing to fit specific gift giving opportunities. If someone wants a sweater for Christmas, I make a sweater. If someone’s having a baby, it’s going to be all things baby for a while. There always has to be a reason to make something. I have a much harder time just sitting down and coming up with a design without any context. Recently I’ve started designing more for myself, but it still is usually when there’s something I need (or want). If you want a very detailed look at my design process, check out my series on “How a Pattern Happens”.


Tell us about your design for the CGOA CAL. Are there any special techniques that crocheters will need to master to complete the project?
Sargassum is a perfect example of designing to fit a need. I was going on vacation in Florida, and needed something light and pretty for the chillier evenings. I’ve had a gorgeous skein of discontinued cotton yarn in my stash that I had been wanting to use, and the color reminded me of the Sargassum seaweed that you find on the beach. The lace stitch for the bottom border was something I had played with months earlier (coincidentally, in the same yarn). The pattern does incorporate a lot of different techniques, which is one reason why I thought it would be best introduced as a CAL. The techniques appear one at a time, so you can master one before having to deal with another, and the pattern includes links to tutorials for all of them. Some of them are also optional, and easier alternatives are provided. The first is foundation stitches, then chainless starting double crochets, a few rows later there are puff stitches worked so they lie sideways, then color changes, beads, linked double crochet in the top border, and finally a shell and picot edge. Fun fact – that’s my mom in those pictures!


What is your absolute favorite Knitter's Pride product, the one you would HAVE to have if you were stranded on a desert island?
If you had asked me that last year, I would have said my sock blockers. These things are magic for socks, and I think they even help them to dry faster. Also, when you tie them together, they work really well as a weight on hand-spun skeins! But, I recently got a set of Nova Cubics Platina Interchangeables, and those are now my new favorite Knitters Pride product. I swatched with them right away and they are absolute heaven. The unique ergonomically shaped shafts are surprisingly comfortable to hold and help with getting the needle into tighter stitches, and they’re just the right amount of slippery for my taste too. Just my luck though - since I got them I’ve been buried in lighter weight projects that need smaller needles. As soon as I have a chance, I’m dying to work up a nice big project on them.
Do you have any crocheting horror stories or mishaps?
I tried to make a swimsuit cover-up once, with a big fillet crochet butterfly on the back. It came out really nice…until I wore it over a wet swimsuit. I had used a kitchen cotton, and I learned the hard way just how much that type of yarn can stretch when it’s wet. Think saggy butterfly butt. Yeah, not attractive.

Winner
Congratulations to BinaBKnits,  this month's giveaway winner! We will contact you to arrange for the delivery of your prize. Thanks to everyone who entered this month's giveaway, we got some awesome ideas for - click here to check out the comments & get inspired to reuse and recycle!