Pages

Showing posts with label rejoice pom pom maker. Show all posts

Summer Fun with Pom Poms

Today, we're featuring three fun craft ideas for the Knitter's Pride Rejoice and Nirvana Pom Pom Makers. These are great crafts for using up those odd bits of leftover yarns and fun to do with kids, too! 


For our projects, we made larger pom poms using the 2.5"/8.5cm Nirvana pom pom maker and smaller pom poms using the 3/8"/3.5cm Rejoice pom pom maker. For instructions on how to make pom poms, take a look at this tutorial from our blog archive.  

Pom Pom Hair Tie
Our first project is a fun summer accessory for keeping the hair off your neck! All you'll need is a pom pom in the size of your choice (we used a small one) and a hair tie. 


Using the tails from your pom pom, secure the pom pom to your hair tie. Be sure to wrap a few times and tie some nice strong knots so that it won't come apart. 


Voila, you have an adorable pom pom hair tie! 


Pom Pom Flowers
Our second project is a great way to decorate your home throughout the year - and you won't have to worry about watering or wilting! We went outdoors to source a small branch to use with both large and small pom poms (in the example below, we use one of each size, but feel free to get creative!).


All you have to do is tie your pom poms to the branch using the tails; you can use a little craft glue to secure the ends in if you like. Using hot glue or other craft glue to secure each pom pom might be helpful with more slippery yarns like cotton. You can make several and put them in a vase for a lovely decoration! 


Pom Pom Garland
With our third project, you can add a little color to any part of your home! You can make your garland as long as you'd like, depending on where you plan to hang it. 

For our garland, we used 8 of the smaller pom poms and crocheted a chain approximately 4.5 feet long. 

To make sure your garland comes out fairly even, fold your crochet chain in half, and arrange the pom poms in the order you'd like them to appear. Remember that the ones at the center (on the left in the photo below) should be closer together since the crochet chain is folded.


Tie your pom poms to your crochet chain and trim the ends. Now you're ready to hang your garland! 


We used ours to brighten up a shelf in the kitchen! Where would you hang a pom pom garland?


Giveaway Winner
Congratulations to Shelley, you're the lucky winner of a Nova Platina Deluxe Interchangeable Needle Set! We'll be in touch to arrange delivery of your prize. Thanks to everyone who participated! 


Free Pattern: Crochet Button Bunny + Winner!

Today we have a free crochet pattern from Handmade by Stefanie, a Chicago-based blogger who knits, spins and crochets compulsively in her free time. She originally designed the Button Bunnies as a knitted toy pattern to celebrate the debut of a friend's hand-dyed yarn company, and has always wanted to convert the pattern to crochet for her fellow amigurumi enthusiasts. For a complete list of abbreviations used in this pattern, click here. 


Crochet Button Bunny
By Stefanie Goodwin-Ritter


Yarn:

218 yards worsted weight yarn in MC

shown in Manos del Uruguay Maxima in Sweet Potato

10 yards worsted weight yarn in CC1 for pocket

shown in Manos del Uruguay Clasica in Forest Floor

15 yards worsted weight yarn in CC2 for tail

shown in Manos del Uruguay Maxima in Nickel

Less than 5 yards of black worsted weight yarn for embroidered features

Supplies:

G (4mm) Crochet Hook

Safety eyes – 1 pair 12mm

½” Button - 1

Fiber-fil stuffing

Tapestry Needle
Knitter’s Pride Rejoice Pom Pom Maker - 5.5cm

Gauge: 14 sts = 4” in SC; gauge is not critical for this project

Sizes:
One Size: Bunny will stand approx. 7” tall, excluding ears

Notes: The body, head and ears are all worked continuously onto one piece.

Directions

Body:
Starting with magic loop, ch 2. SC 6 sts in second stitch from hook. Click here for a free magic loop tutorial from FreshStitches (if you're a knitter, it's not what you think)!
Rnd 1: *SC twice in 1 st, repeat from * 5 more times - 12 sts.
Rnd 2: *SC twice in 1 st, repeat from * 11 more times - 24 sts.
Rnd 3: *SC twice in 1 st, SC in 1 st, repeat from * 11 more times - 36 sts.
Rnd 4: *SC twice in 1 st, SC in next 2 sts, repeat from * 11 more times - 48 sts.
Rnd 5: SC in all sts - 48 sts.
Rnd 6: *SC twice in 1 st, SC in next 3 sts, repeat from * 11 more times - 60 sts.

SC all rnds for 2½ inches. I recommend placing a removable stitch marker in Rnd 6 to make measuring easier:

Head :
Rnd 1 (decr): *SC2tog, SC in next 2 sts, repeat from * 14 more times - 45 sts.
Rnd 2: SC in all sts - 45 sts.
Rnd 3 (decr): *SC2tog, SC in 1 st, rep from * 14 more times - 30 sts.

SC all rnds for 2 inches. I recommend placing a removable stitch marker in the same manner as before to make measuring easier.

Remove hook, but don’t fasten off. You will be placing removable stitch markers to use as guides for crocheting the ears.

Get your removable stitch markers ready and fold your bunny in half with the beginning of round at right as follows:


Place markers on the following stitches in round: 4, 12, 18 and 28. The top of your bunny should now look like this: 


You will be crocheting both ears onto the top of the head by working the first and last 3 sts of the round for 2 inches in single crochet to make the first ear, then breaking the yarn and reattaching it at Stitch 13 (where you placed a marker) and working these stitches (13-28) in the round for 2 inches as well. Break yarn. Use tail to sew the tops of each ear closed.  


Arms – Make 2:

Starting with magic loop, ch 2. SC 6 sts in second stitch from hook.

Rnd 1: SC twice in each stitch - 12 sts.

SC in all sts for 5 more rnds. Break yarn and fasten off.

Tail:

Make tail using CC1 with the 5.5cm Rejoice Pom Pom Maker - click here for easy instructions on the Knitter's Pride blog.

Pocket - worked flat:

With CC2, ch 11.
First row: beginning in second st from hook, SC 10 sts, ch 1.
Work 6 more rows SC in all sts.
Buttonhole row: SC in first 4 sts, ch 2 and skip the next 2 sts, SC in last 4 sts.
Continue working in SC for 1 more row. Break yarn and fasten off.

Finishing:  
Stuff body. Weave in ends. Install safety eyes, then lightly stuff ears and arms. Sew top of head together.  Pin arms to side of body and sew on when you are satisfied with their placement. If you need help attaching your bunny's arms, click here for a free tutorial on attaching limbs to amigurumi from FreshStitches. 

Pin tail to bottom center of bunny back and sew on when you are satisfied with its placement.  Using black yarn, embroider a nose on the bunny’s face. Pin pocket to front of bunny and sew on; sew on button to close pocket.

Winner


Congratulations to apeeling, you are the lucky winner of a Waves Crochet Set! We'll be in touch via Ravelry to arrange for the delivery of your prize. Thanks to everyone who participated this month!


Winners + Put a Pom On It

Congratulations to Ravelers goblinqween, bearybearco and indiechixor  - you have all won Rejoice Pom Pom Maker Sets in our giveaway this month! We'll be in touch with you shortly to arrange for the delivery of your prizes. Thanks to everyone who entered our contest - be sure to bookmark us for more great giveaways this fall!

In our last blog post, we shared a step-by-step tutorial for making this season's hottest accoutrement, pom poms, using our new Rejoice Pom Pom Maker Set. In this week's post, we've got plenty of ways for you to use your poms to make fashionable and fun projects to make, wear and give! 

First up, we have the tried-and-true pom pom hat, which is clearly a favorite fall trend - just look at all of these new fall designs from Knit Simple, Dull Roar, Knitscene and the My Mountain Series! 

L-R: #17 Striped Toque by Christina Behnke, Kotiya by Alexandra Tinsley, Kilimanjaro from the My Mountain Series, and Forester Hat by Ashley Rao.
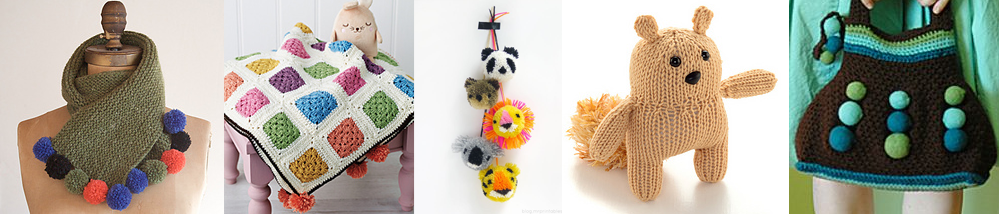
Pom poms can add a flourish to everyday items such as scarves, handbags and blankets. They're also excellent for making cute little toys: there are plenty of pom pom animal tutorials on Pinterest, or you can sew on a pom pom tail as shown in Rebecca Danger's squirrel toy from her new book or Raveler Mercourier's Button Bunnies. 
L-R: Pom Pom Happiness Scarf by Mary Jane Mucklestone, Sherbet Dip Blanket by Nicki Trench, Animal Pom Poms, Small Squirrel by Rebecca Danger, and Pea Pod Purse by Anna Tirat-Gefen.
We've also spotted some creative uses for poms such as wall hangings, flowers, and even a chandelier! 
L-R: Pom Pom Chandelier, Ever Blooming Flowers by Gari Lynn, Pom Pom Wall Hanging, and Pom Pom Wreath by Mary Jean Daigneault. 

For more pom pom project ideas, check out our inspiration board on Pinterest. We hope you'll share your pom pom projects with us this fall in the Knitter's Pride Ravelry group!