Pages

Showing posts with label free crochet pattern. Show all posts

Free Knit & Crochet Patterns for Valentine's Day

Valentine's Day is just around the corner, and we've spotted several fun, free patterns to celebrate the day - just grab some yarn and your favorite Knitter's Pride needles or hooks and get ready to stitch something sweet for the one you love!

Free Knitting Patterns: Accessories
Valentine Mitts by Schibot Garne or the Valentine Mittens by Anita Viksten will keep hands warm; for toasty toes, try the Have a Heart Valentine Socks by Denise Bein Kroll or the V for Valentine Socks by Ellie Jones. If you're looking to knit a hat, try Milda by Claire Slade, the Valentine's Day Hat by Lisa Overby, or the Cupid's Mix Beanie by Jamie Hoffman. If you're short on time, whip up a super bulky Valentine Cowl by Sandra Nesbitt.
Pin these patterns!


Free Crochet Patterns
Keep your valentine warm with the Mini Heart Knit Look Hat by Kelsey Daughtry or the Valentine Beanie by Krystle Lindsay. If you're crocheting for wee ones, try the child-size Hearts and Stripes Forever by Christina Ramirez  or the Little Sweetheart Valentine's Day Hat by Lace Kennedy Crochet. Or, keep chills away with the Scarf Love Fringe Scarf by Jeris Swanhorst or the Madly In Love Cowl by Tamara Kelly.

Pin these patterns!

All Things Heart-Shaped
For knitters, the Love Note Valentine Pouch by Angelina Panozzo is perfect for stashing away special messages; add a festive flair to your craft room with the Easy Knit Heart Garland by Cassandra May; hang up a few stuffed No-Sew Hearts by Mary Anne Walters or decorate with a rainbow of Hearts in a Hurry by Frankie Brown; or use up leftover bits of yarn to knit a cute Knit Heart Pendant by Sarah E. White.

Pin these patterns!

For crocheters, decorate with a few Valentine's Day Heart ornaments by GoldenLucyCrafts; whip up a few heart-shaped baskets with the Forever Love pattern by DROPS design; make a colorful collection of Candy Conversation Hearts by ChiWei Ranck or try the Brioche Heart by Tatsiana Kupryianchy; or, whip up a few Light Heart Dishcloths by Naztazia.

Pin these patterns!

For more Valentine's Day pattern inspiration, check out our Pinterest board here.

Free Patterns: Recipe for Relaxation Knit & Crochet Mason Jar Cozy + Free Printable Gift Tags

The holiday season is in full swing! Today, we have two free patterns for a quick gift you can whip up in just a few hours. These mason jar cozies are a fun and festive way to package a thoughtful gift, and mason jars can hold so many things: colorful candies, hot chocolate or baking ingredients, or relaxing bath salts (we share our favorite recipe below!). Whether you knit or crochet, we've got you covered with this simple pattern using a bulky weight yarn. Enjoy!


Recipe for Relaxation: Relaxing Bath Salts
Depending on the size of your jar, you will need to double, triple, or quadruple this base recipe. You'll need 1/2 c. Epsom salts (found at most grocery or drug stores), 1/2 c. baking soda, and 10-20 drops of your favorite essential oil. Some popular choices include lavender (relaxing), rose absolute (relieves anxiety), bergamot (uplifting), eucalyptus (great for cold & flu season), or tangerine (calming). Mix everything together in a clean bowl and transfer to your mason jar.

Crochet Mason Jar Cozy

Supplies: 

Gauge: 11 stitches and 16 rounds = 4" in single crochet

Finished Dimensions: To fit 3" circumference jar (see pattern notes for how to adjust for other sizes); 3.5" height

Abbreviations: 
sc - single crochet
dc - double crochet
rnd(s) - round(s)

To Make Cozy:

Begin with a magic ring - sc 6 stitches. Use removable stitch marker to mark the beginning of each round as you work; you will be working in a continuous spiral unless otherwise noted. 

Increase Rnd 1: sc twice in each stitch. 12 stitches. 
Increase Rnd 2: *sc 1 stitch, sc twice in next stitch, repeat from * to end of round. 18 stitches.
Increase Rnd 3: *sc 2 stitches, sc twice in next stitch, repeat from * to end of round. 24 stitches.
Increase Rnd 4: *sc 3 stitches, sc twice in next stitch, repeat from * to end of round. 30 stitches.

Note: You can adjust final circumference by working fewer increase rounds (for a smaller jar) or working additional increase rounds (for a larger jar). For a larger cozy, simply add 1 more sc stitch between increases. 

Work turning rnd: sc all stitches through the back loop only. When you reach the end of the round, slip stitch in the first stitch at the beginning of that round. Chain 1 stitch.

For next 2 rnds, sc all stitches. When you reach the end of the second round, slip stitch in the first stitch at the beginning of that round. Chain 3 stitches.

Next rnd: Skip first stitch of rnd, *DC in next stitch, skip next stitch and chain 1, repeat from * to end of rnd. When you reach the end of the round, slip stitch in the first stitch at the beginning of that round to close. Chain 1 stitch.

Single crochet all stitches until you reach desired height (sample shown measures 3.5 inches from turning rnd). When you reach the end of the final round, slip stitch in the first stitch at the beginning of that round. Break yarn and pull through loop to secure. Weave in ends. 

Knit Mason Jar Cozy

Supplies: 

Gauge: 16 stitches and 18 rounds = 4" in stockinette stitch

Finished Dimensions: To fit 3" circumference jar (see pattern notes for how to adjust for other sizes); 4" height

Abbreviations: 
k - knit
kf&b - knit into front and back on 1 stitch (1 stitch increased)
k2tog - knit 2 stitches together (1 stitch decreased)
p - purl
yo - yarn over

To Make Cozy:

Cast on 6 stitches. Use removable stitch marker to mark the beginning of each round as you work; you will be working in a continuous spiral. 

Increase Rnd 1: kf&b 12 stitches. 
Increase Rnd 2: *k1, kf&b, repeat from * to end of round. 18 stitches.
Increase Rnd 3: *k2, kf&b, repeat from * to end of round. 24 stitches.
Increase Rnd 4: *k3, kf&b, repeat from * to end of round. 30 stitches.
Increase Rnd 5: *k4, kf&b, repeat from * to end of round. 36 stitches.

Note: You can adjust final circumference by working fewer increase rounds (for a smaller jar) or working additional increase rounds (for a larger jar). For a larger cozy, simply add 1 more knit stitch between increases. 

Work turning rnd: p all stitches. 

Work 3 rnds in stockinette stitch (k all stitches).

Eyelet rnd: *yo, k2tog, repeat from * to end of round.

Work in stockinette stitch (k all stitches) until you are approximately 1/2" from desired height from turning rnd (sample shown measures 3.5 inches from turning rnd).

P 1 rnd.
K 1 rnd.
P 1 rnd. 

Bind off all stitches knitwise. Break yarn and pull through loop to secure. Weave in ends.


Since it's the season of giving, we have two more bonuses for you this month!


Like this post? Pin it!


Winner + Free Crochet Mitts Pattern

Congratulations to Raveler mmmgood304, who won this month's giveaway for a Chunky Mesh Wrist Warmers kit! We'll be in touch with you shortly to arrange for the delivery of your prize.

Our previous blog post featured a free pattern to knit a quick pair of mitts using our Jumbo Birch needles and two skeins of Briggs & Little Super Yarn, and we promised a freebie for our fans who crochet in this week's blog post. These simple mitts are very easy to customize for a variety of hand sizes and stitch up ultra-quickly using just 1 skein of Briggs & Little Super Yarn and a Jumbo Birch crochet hook.

Enjoy!

Quick Crochet Wrist Warmers

by Stefanie Goodwin-Ritter

Supplies:
Gauge: 5 sts and 4 rows = 4 inches in single crochet, blocked

Finished Dimensions: 7" circumference, 7" length (allow approx. 1" negative ease; see instructions below for how to customize your fit)

About this pattern: A bulky weight yarn is worked with a larger hook size to product a mesh-like single crochet fabric. What makes this yarn special is the story: Bricggs & Little is Canada's oldest woolen mill and produces premium yarns spun from 100% domestic wool, and is milled, carded, dyed, and spun at their factory in York Mills, New Brunswick, Canada.

The finished mitts will be very stretchy, so be sure to knit the size that is approximately an inch smaller than your desired hand circumference. Don't be alarmed by the size and shape of your project while it is being knit - the magic is in the blocking!

Mitts (Make 2):
Ch 9 and work single crochet in 8 sts, beginning with second ch from hook.

Single crochet all rows until piece measures 6 inches from start. For your final row worked once you have achieved your intended length, slip stitch in final stitch, snip your yarn end leaving several inches for seaming, and pull through to secure yarn end.

How to get a custom fit: If you would like to create mitts with a larger or smaller circumference, you can add or subtract rows here - just be sure to take into account the notes above regarding negative ease and gauge when blocked.


With wool needle or tapestry needle, seam five inches of cast on and bound off edge together; leave the next 1.5 inches unseamed for thumb; tack the opposite edge together for top of mitt.


Wash your mitts in your favorite wool wash and lay flat to dry on Knitter's Pride Blocking Mats. To achieve stated dimensions and neat edges, use Knitter's Pride Knit Blockers as directed in our previous blog post, found here.


Wear & enjoy!

Project Inspiration


Small projects are a great way to take a break between larger more involved projects. We like to think of these as little knit and crochet snacks--small, satisfying, quick and easy. A good small project will cleanse your palette and leave you feeling successful and ready to take on a bigger more challenging project.

Today we have rounded up some of our favorite quick and easy knit and crochet patterns. And better yet, all of these patterns are available for free on Ravelry!

Knit Patterns
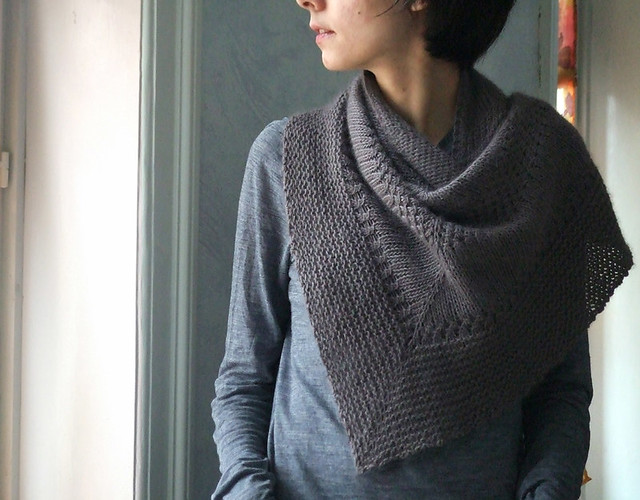
A lovely simple shawl recipe perfect for using up stash!
Textured Shawl Recipe by Orlane
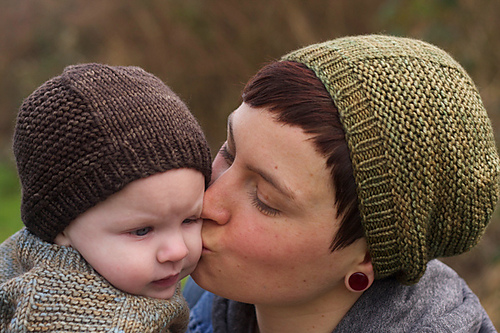
Hats for the whole family!
Barley by Tin Can Knits
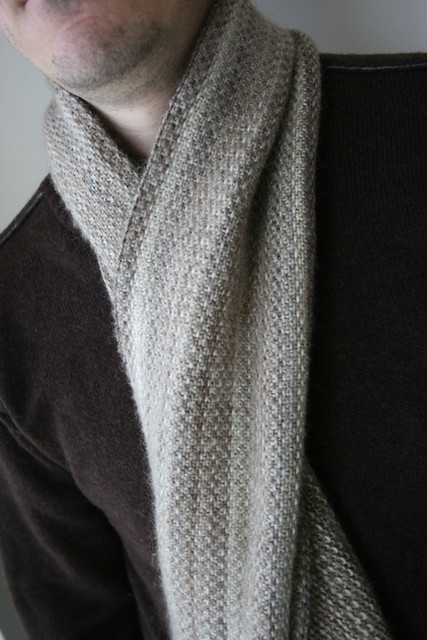
A perfect gender neutral scarf in linen stitch. This pattern is great for variegated yarns.
Cerus Scarf by Hillary Callis Smith
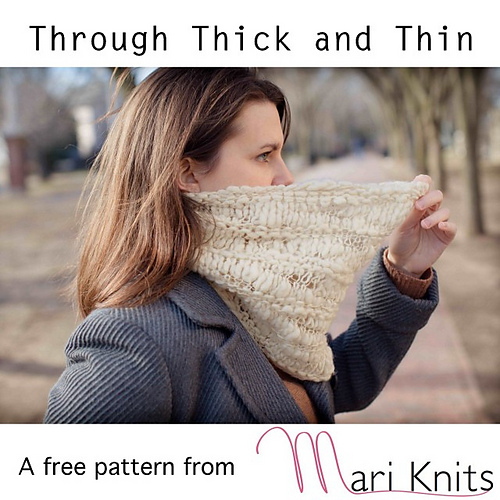
If you're a spinner or have a skein of thick and thin knit up this quick and easy cowl.
Through Thick and Thin by Mari Chiba
Crochet Patterns
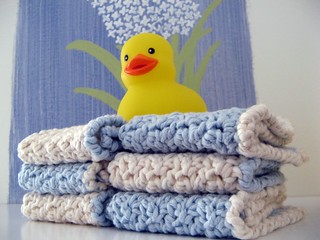
Washcloths are useful and also make great gifts.
Oh So Soft Baby Washcloths by Theresa Grant
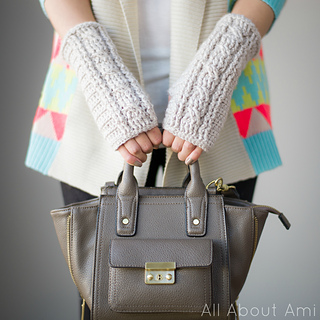
While warmer weather is still yet to arrive in most places keep your hands warm with these lovely cabled hand warmers.
Cable Wrist Warmers by Julee Fort

This crochet hat is perfect for transitioning into spring. Get a head start on the warm weather with this hat.
Easy Peasy Women's Winter Hat by Mary Englar

Have you knit or crochet any of these patterns? Or do you have a favorite quick and easy pattern you'd like to share? Leave a comment telling us!

Giveaway
Congratulations to Cheryl G, you're our lucky winner! We'll be in touch to arrange delivery of your Karbonz Midi Interchangeable Needle Set. Thanks to everyone who participated.

Free Pattern: Crochet Button Bunny + Winner!

Today we have a free crochet pattern from Handmade by Stefanie, a Chicago-based blogger who knits, spins and crochets compulsively in her free time. She originally designed the Button Bunnies as a knitted toy pattern to celebrate the debut of a friend's hand-dyed yarn company, and has always wanted to convert the pattern to crochet for her fellow amigurumi enthusiasts. For a complete list of abbreviations used in this pattern, click here. 


Crochet Button Bunny
By Stefanie Goodwin-Ritter


Yarn:

218 yards worsted weight yarn in MC

shown in Manos del Uruguay Maxima in Sweet Potato

10 yards worsted weight yarn in CC1 for pocket

shown in Manos del Uruguay Clasica in Forest Floor

15 yards worsted weight yarn in CC2 for tail

shown in Manos del Uruguay Maxima in Nickel

Less than 5 yards of black worsted weight yarn for embroidered features

Supplies:

G (4mm) Crochet Hook

Safety eyes – 1 pair 12mm

½” Button - 1

Fiber-fil stuffing

Tapestry Needle
Knitter’s Pride Rejoice Pom Pom Maker - 5.5cm

Gauge: 14 sts = 4” in SC; gauge is not critical for this project

Sizes:
One Size: Bunny will stand approx. 7” tall, excluding ears

Notes: The body, head and ears are all worked continuously onto one piece.

Directions

Body:
Starting with magic loop, ch 2. SC 6 sts in second stitch from hook. Click here for a free magic loop tutorial from FreshStitches (if you're a knitter, it's not what you think)!
Rnd 1: *SC twice in 1 st, repeat from * 5 more times - 12 sts.
Rnd 2: *SC twice in 1 st, repeat from * 11 more times - 24 sts.
Rnd 3: *SC twice in 1 st, SC in 1 st, repeat from * 11 more times - 36 sts.
Rnd 4: *SC twice in 1 st, SC in next 2 sts, repeat from * 11 more times - 48 sts.
Rnd 5: SC in all sts - 48 sts.
Rnd 6: *SC twice in 1 st, SC in next 3 sts, repeat from * 11 more times - 60 sts.

SC all rnds for 2½ inches. I recommend placing a removable stitch marker in Rnd 6 to make measuring easier:

Head :
Rnd 1 (decr): *SC2tog, SC in next 2 sts, repeat from * 14 more times - 45 sts.
Rnd 2: SC in all sts - 45 sts.
Rnd 3 (decr): *SC2tog, SC in 1 st, rep from * 14 more times - 30 sts.

SC all rnds for 2 inches. I recommend placing a removable stitch marker in the same manner as before to make measuring easier.

Remove hook, but don’t fasten off. You will be placing removable stitch markers to use as guides for crocheting the ears.

Get your removable stitch markers ready and fold your bunny in half with the beginning of round at right as follows:


Place markers on the following stitches in round: 4, 12, 18 and 28. The top of your bunny should now look like this: 


You will be crocheting both ears onto the top of the head by working the first and last 3 sts of the round for 2 inches in single crochet to make the first ear, then breaking the yarn and reattaching it at Stitch 13 (where you placed a marker) and working these stitches (13-28) in the round for 2 inches as well. Break yarn. Use tail to sew the tops of each ear closed.  


Arms – Make 2:

Starting with magic loop, ch 2. SC 6 sts in second stitch from hook.

Rnd 1: SC twice in each stitch - 12 sts.

SC in all sts for 5 more rnds. Break yarn and fasten off.

Tail:

Make tail using CC1 with the 5.5cm Rejoice Pom Pom Maker - click here for easy instructions on the Knitter's Pride blog.

Pocket - worked flat:

With CC2, ch 11.
First row: beginning in second st from hook, SC 10 sts, ch 1.
Work 6 more rows SC in all sts.
Buttonhole row: SC in first 4 sts, ch 2 and skip the next 2 sts, SC in last 4 sts.
Continue working in SC for 1 more row. Break yarn and fasten off.

Finishing:  
Stuff body. Weave in ends. Install safety eyes, then lightly stuff ears and arms. Sew top of head together.  Pin arms to side of body and sew on when you are satisfied with their placement. If you need help attaching your bunny's arms, click here for a free tutorial on attaching limbs to amigurumi from FreshStitches. 

Pin tail to bottom center of bunny back and sew on when you are satisfied with its placement.  Using black yarn, embroider a nose on the bunny’s face. Pin pocket to front of bunny and sew on; sew on button to close pocket.

Winner


Congratulations to apeeling, you are the lucky winner of a Waves Crochet Set! We'll be in touch via Ravelry to arrange for the delivery of your prize. Thanks to everyone who participated this month!


Summer Stitching Inspiration & A Giveaway

Summer is here, and for many people that means spending more time outside. We have some smaller projects for the home that are perfect for summer stitching. These instant gratification projects will satisfy your stitching needs, and they are perfect projects to be worked on when you're out and about! As an added bonus, all of these patterns are available for free via Ravelry! Follow Knitter's Pride on Pinterest to see more stitching inspiration! 

Knit

Make these adorable Leafy Washcloths for yourself or as gifts! You can use any weight yarn and they use less than 50 yards of yarn! 
Leafy Washcloth by Megan Goodacre
The Summer Fling bag is perfect for carrying all your essentials around this summer. Worked in linen, it's machine washable--making it a great bag for the beach! 
Summer Fling by Espace Tricot

Crochet

These adorable Owls could be made into keychains as pictured, but they also would make great bunting, mobile, or accessory to a knit or crochet bag. With so many possibilities, who could resist?
Owl Key Chain by Yarn Artists
These bright and cheery coasters are small and quick. Have fun with combining contrast colors or using variegated yarns. You could also make them larger to make hot pads.
Roller Coasters by Kristen from Sheep and Lemons

Giveaway

This month we're giving away a Karbonz Interchangeable Needle Starter Set! Made with a carbon fiber shaft and metal tips, these popular needles are lightweight and have nice sharp points. 

To enter leave a comment on this post telling us what you're stitching this summer. Don't forget to leave your Ravelry ID so we can contact you if you're the winner. We'll be announcing the winner on July 25th. Good luck! 


Free Pattern: Tadley's Diagonal Blanket

Today we have a free crochet blanket pattern from designer Marie Segares, the Underground Crafter. Marie Segares has been hooked on crochet since she learned from her grandmother when she was 9. She conquered her fear of knitting in 2010. In addition to designing, Marie teaches both crochet and knitting in the New York City metro area and at regional fiber events. She is a Professional member of the Crochet Guild of America and a Designer/Teacher member of The Knitting Guild Association. Marie always appreciates visitors to her blog, Underground Crafter, where she shares her crafty adventures, along with interviews, book reviews, and giveaways.

I love crocheting baby blankets. They work up quickly (in comparison to adult blankets!) and are usually cherished by new parents and babies alike! When one of my dearest friends was expecting her first child, I knew I had to crochet something special.

I decided to use double-ended crochet because it looks great – but different – on both sides. And, to combat the love-hate relationship I develop with all of my crocheted blankets during the last few rows, I decided to crochet this on the bias, increasing towards the center and then decreasing until the end. After you reach the center point, each row is shorter than the one before it!

This blanket is very lush and thick, and works equally well as a playmat in the spring or a stroller blanket in the winter. Gauge isn’t critical, and it can be easily resized (though you may need more or less yarn).

Choose a flexible double-ended crochet hook, like one created from the Knitter’s Pride Dreamz Interchangeable Tunisian/Afghan Crochet Hook Set or the Knitter’s Pride Bamboo Interchangeable Tunisian/Afghan Crochet Hook Set. If you don’t have two Tunisian hooks in the same size, you can always switch the positions of the hook and end cap at the beginning of each row where you slide loops and turn.


Free Pattern: Tadley’s Diagonal Blanket by Marie Segares


Finished Size
Adjustable. Photographed sample is 36” (91.5 cm) square.

Materials
• King Cole Merino Blend Aran (100% superwash wool, 1.75 oz/50 g/88 yd/80 m) – 10 skeins each in Denim 778 (CA) and in Aran 776 (CB), or approximately 840-1,000 yd (770-915 m) in each of 2 colors in any medium/worsted weight yarn.
• I/9 5.5 mm flexible double-ended crochet hook, or size needed to obtain gauge.
• Yarn needle.

Gauge
18 sts x 18 rows in Tss = 4” (10 cm). Exact gauge is not critical for this project.
Abbreviations
CA = color A
CB = color B
ch = chain
ea = each
rep = repeat
Rnd(s) = Round(s)
sc = single crochet
sk = skip
sp = space
st(s) = sts
Tfs = Tunisian full stitch (used to increase 1 st in this pattern) = Insert hook under horizontal bar (between 2 vertical bars), yo and draw up loop onto hook.
Tss = Tunisian single stitch = Insert hook under next vertical bar, yo and draw up loop onto hook.
Tss2tog = Tunisian simple stitch 2 together (used to decrease 1 st in this pattern) = Insert hook under next 2 vertical bars, yo and draw up loop onto hook.

Pattern notes:
• Always sk first vertical bar (below first loop on hook) at beginning of row. 
• Blanket is crocheted in rows on the bias, increasing to the center and then decreasing to end. Border is crocheted in the round.
• Weaving in ends in double-ended crochet projects can be challenging. Change colors at beginning or end of rows when possible.
• For edging, a stitch marker or piece of scrap yarn can be used to indicate corner st.

Pattern Instructions

Blanket

With CA, ch 3.

Set Up Row: Sk 1st ch. (Insert hook in next ch, yo and pull up a loop) twice. (3 loops)

Increase stitch count to center
Row 1: Slide loops to other hook, turn. With CB, ch 1, *yo and draw through 2 loops. 
Rep from * across.

Row 2: Tfs in first sp between vertical bars, Tss in each vertical bar across to last sp, 
Tfs, Tss in last st. (Increase by 2 sts)

Row 3: Slide loops to other hook, turn. With CA, ch 1, *yo and draw through 2 loops. 
Rep from * across.

Row 4: Rep Row 2.

Rep Rows 1-4 until sides measures approximately 34”/86 cm (or desired length), ending after Row 3.

Decrease stitch count to end
Row 5: Tss2tog, Tss in ea vertical bar across to last 3 sts, Tss2tog, Tss in last st. (Decrease by 2 sts)

Row 6: Rep Row 1.

Row 7: Rep Row 5.

Row 8: Rep Row 3.

Rep Rows 5-8 until 3 sts remain on hook, ending after Row 3.

Final Row: With CB, (insert hook in next vertical bar as for Tss, yo, draw through both loops on hook) twice. Fasten off.

Edging

Rnd 1: Facing side where CA is more prominent, join CB with a sc in corner, 2 sc in same st, *sc in edge st of ea row across to next corner,** 3 sc in corner; rep from * around twice, then from * to ** once. Fasten off.

Rnd 2: Turn, facing side where CB is more prominent, join CA with sc in corner st, 2 sc in same st, *sc in each st around to next corner,** 3 sc in corner; rep from * around twice, then from * to ** once. Fasten off.

Rnd 3: Turn, facing side where CA is more prominent, join CB with sc in corner st, 2 sc in same st, *sc in each st around to next corner,** 3 sc in corner; rep from * around twice, then from * to ** once. Fasten off.

Rnd 4: Rep Rnd 2. 

Finishing
With yarn needle, weave in ends.

Giveaway

This month we're giving away Waves Crochet Hooks in size I/9 (5.5 mm) to two lucky winners! To
enter leave a comment on this post telling us about your last crochet project. Don't forget to tell us your Ravelry ID so we can contact you if you're one of the lucky winners!