This guest post was written by Jody Richards, founder and editor of Knotions Magazine. She’s been a knitter and crocheter for over 30 years and is one of the original users of Ravelry.
Jody shares even more great tutorials here on the Knotions site, and you might be interested in the latest eBook on shawls from Knotions – ShawlStar.
All patterns are free on Knotions and it’s mobile-friendly for both tablets and smartphones. Don’t miss the PDFs of every pattern as well!
Not just for Lace Knitting
Lifelines aren’t just for lace knitting. Read on to learn how they’re helpful for all knitting!
Regardless of your experience level, lifelines can be a great time-saver and sanity-saver if anything ever goes wrong.
And let’s be clear – something WILL go wrong. You might:
- mis-read a chart
- start on the wrong row after putting your work down
- just forget where you are in the sequence.
If any of those things happen and you realize it several rows later, a lifeline can be a real lifesaver.
Great for laundering, too
Another reason for a lifeline is so you can launder the work before you’re done. I’m actually a big fan of this with top-down designs because yarn has a tendency to bloom and who wants to knit more than is needed?
After an important section
I also use lifelines after I’m done knitting a section and it looks good. It’s a way to say “things are good through this point”.
I personally HATE knitting ribbing, so I’ll often add a lifeline once I’m done with ribbing. This way, if I do have to rip, I won’t rip into the ribbing. Because seriously, I don’t need to knit that ribbing a second time.
Putting in a Lifeline
It’s actually a pretty easy thing to put a lifeline in.
Once you’re done with a row:
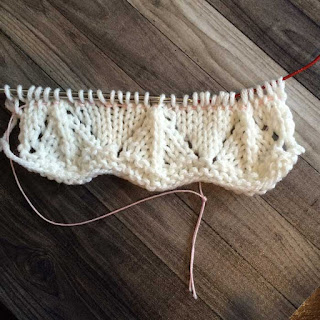
Thread a blunt needle with smooth yarn (I use a smooth cotton for this step). Make it easier on your eyes and use a contrasting color.
Weave the yarn in through the whole row SKIPPING ANY STITCH MARKERS. I use the knitting needle and cable to help guide me. The important thing is that you DON’T miss any stitches. It’s easy to miss a yarn over or do something wrong around increases, so if your pattern has rest rows, I recommend doing this on a rest row.
Now that your lifeline is in the entire row, make sure that the lifeline yarn doesn’t pull the work in and make it tighter. Then, cut the yarn to be a length of more than the width of the work so you can knot the ends together and, again, avoid it from pulling the work in at all.
Knot the ends together.
IMPORTANT: Once you’re done, make sure you remember what row it’s on. An easy way to remember this is if you do it after you’ve knitted the last row of a repeat. But that may not be convenient, and you might need to do it at another time. If so, just make sure you note the row number. A couple ways you can do this:
- Indicate it on the printed chart.
- Take note of it in your Ravelry project.
- Keep track of it on your cell phone.
These are just ideas – the important thing is that you DO it.
If you need to use the Lifeline
If you find yourself in need of ripping down to deal with an error, have no fear because that’s why you put in the lineline!
Just take your needle out of your work and rip down. As long as you caught every stitch when you added the lifeline, the ripping won’t go beyond that row.
Now that you’ve ripped down, you need to put the work back on the needles. Just follow the opposite process this time.
Once you’ve put the work back on the needles, you’re ready to start knitting again! Just make sure you start working on the appropriate row (you took note of that as I suggested above, right?) and that you don’t catch the lifeline while you’re knitting that first row.
An Alternate Way to Thread a Lifeline
Just like people prefer to knit in different ways, there are multiple ways to thread a lifeline.
If you have interchangeable needles with the little tightening holes, you might want to try this way instead.
In order to do this, you need to knit the work using a pair of interchangeable needles.
Step 1: Scoot all the work onto the metal part of the needle
Step 2: Fish the lifeline yarn through the tightening hole. Knot it loosely (I say loosely because you’ll need to undo it in Step 4 below.
Step 3: Scoot the work down the needle and onto the cable to it’s all on the lifeline yarn.
Step 4: Untie the knot at the tightening hole. Knot the lifeline yarn together.
Step 5: Continue knitting regularly, being careful not to catch the lifeline yarn when knitting.
Give a Lifeline a Try
I gave you two ways to add a lifeline to your work and steps on how to remove it.
I also gave you a variety of ideas on ways to use a lifeline in your work because it’s more than just for lace.
Make sure you give them a try! They’ll likely save you time and make your work nicer!
Also Read: Health Benefits all Stitched Together
Like this post? Pin it!


I am using dental floss as a life line but having a hard time getting my stitches back on needle when I had to rip out a few rows of fisherman rib. What am I doing wrong. I put the dental floss in the hole on my Zing interchangeable needle and just knitted across as normal but I don't think I'm doing the next row correctly or I need stronger type of life line
ReplyDelete